
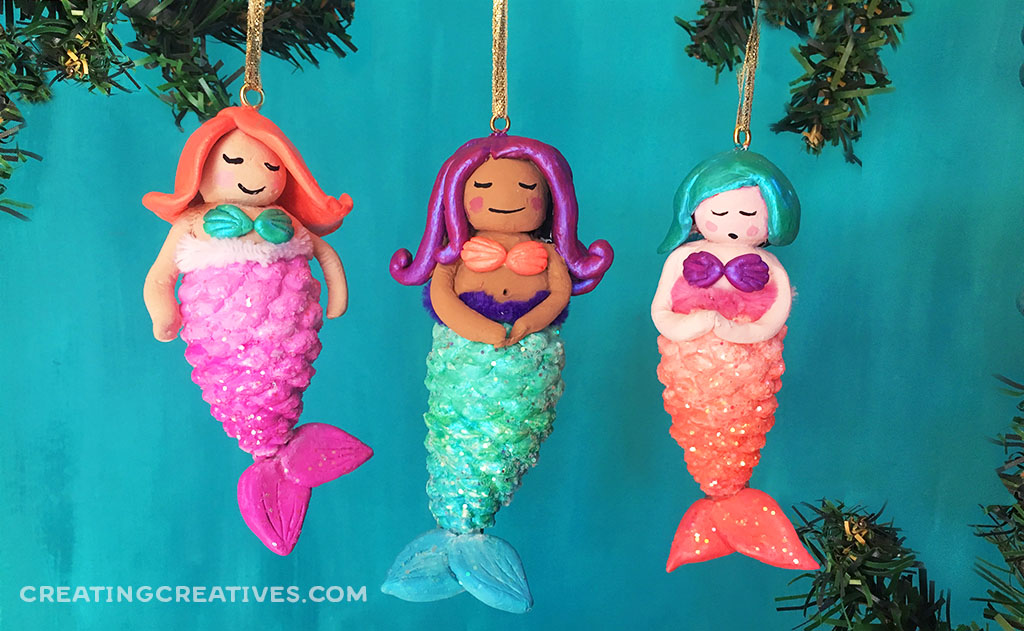
I have been waiting all year to share this DIY Mermaid Ornament with you! Last Christmas I was taking a walk and found a bunch of cool pinecones. I was looking at them and their texture reminded me of a mermaid tail. ‘Ah Ha!’ I thought, ‘Mermaid Ornaments!’. I really had no idea how I was going to make the body or fins, but the idea was planted. My initial idea was to use bump chenille for the tail fins, but that didn’t really look right so I let the idea simmer.
After some simmering I went to one of my trusty books of inspiration Glitterville’s Handmade Christmas. Stephen uses a lot of paper clay, in his projects and I wanted to try it out, but on a trip to JoAnns I couldn’t find any so decided to try some air dry clay instead, and am now in love with air dry clay and want to make all the things. I had such fun making these and think they would make some great Garden Ornaments as well! I hope you love making them as much as I did, and if you do make one be sure to tag me @creatingcreatives.
PINECONE MERMAID ORNAMENT SUPPLIES:
This blog post contains affiliate links.
- Air Dry Clay
- Pinecone
- Paper Clip
- Small Screw Eye (we used 1.3cm / .5″)
- Acrylic Paint – We used Purple Flash & Aqua Flash from this set
- Bump Chenille or Pipe Cleaner
- Glitter
- Ribbon
- Super Glue (preferred) or Hot Glue
SOME THINGS TO NOTE BEFORE WE START:
Before you start you’ll want bake out any little bugs from your pinecones. To do this preheat your oven to 200 degrees fahrenheit, then place your pinecones on some aluminum foil on a cookie sheet and bake for about 30 mins. Be sure keep an eye on your oven while you’re doing this.
I found this video to be helpful for how to attach the clay together so it doesn’t break off when it’s dry.
You can totally do this process with colored clay so you don’t have to paint it later, which can help when there are hard to reach places to paint with your paintbrush.
If you’re looking for an easier ornament, you can just make the tail, which will look just as beautiful!
HOW TO MAKE A MERMAID ORNAMENT FROM A PINECONE:
1. Take 2 small bits of air dry clay and place them at the bottom of your pinecone to get an idea of how big you want your tail. Once you’ve figured out how much clay you need roll each piece into a ball, then flatten out the ball, keeping it about the thickness that I show in the picture below. Then pinch one end of the circle creating a tear drop shape. Keep playing with molding both pieces until you’re happy with your tail shape. Attach the 2 pieces of your tail together then press into your pinecone to make an impression which we’ll use when we glue the tail on later.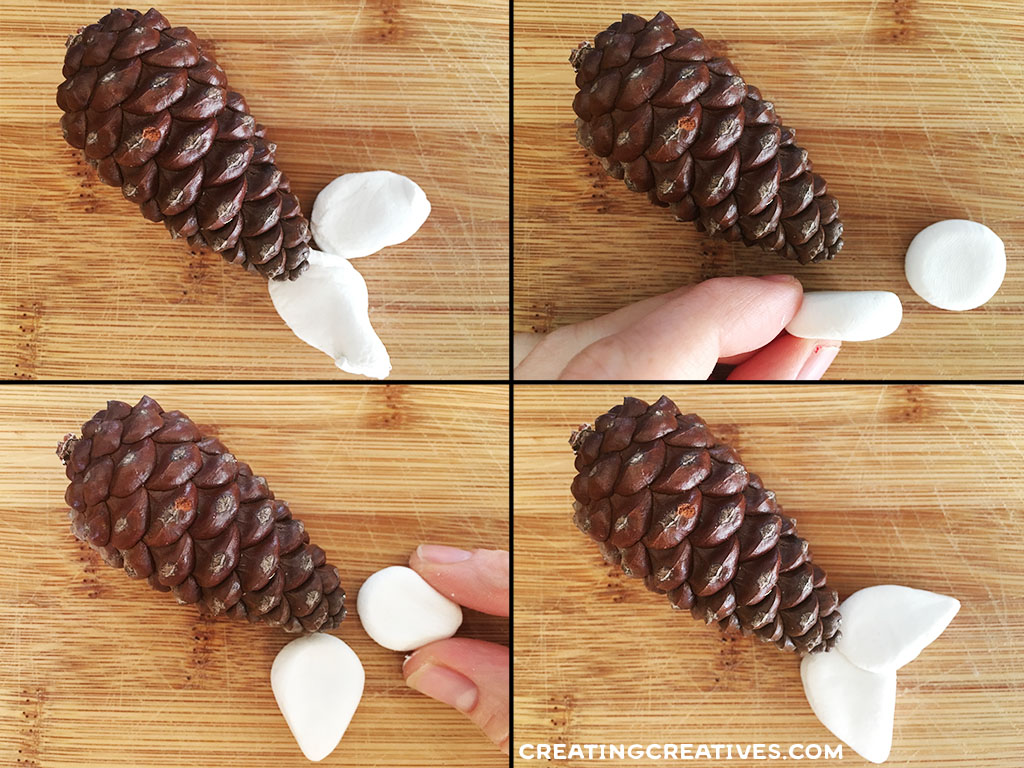
Once your tail is done you can score some marks on the outside using the back of a knife, or toothpick to give it a little texture.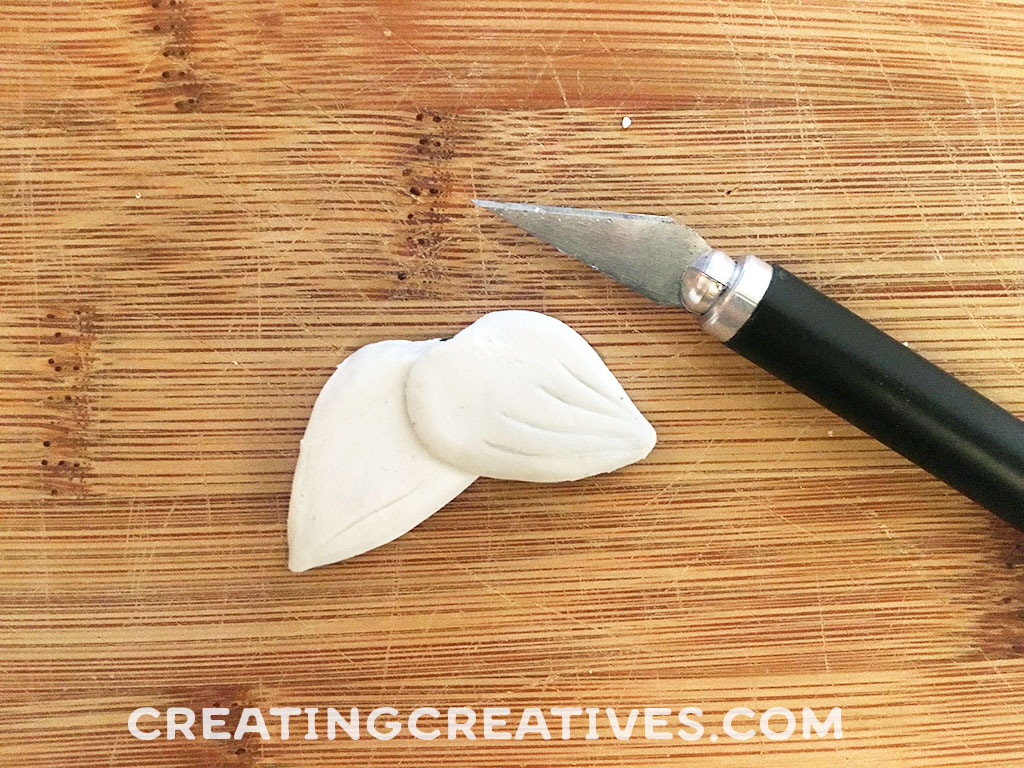
2. Next roll out a ball for the head, and another for the body. For the body roll an oval shape then cut the bottom of it off. Press your body shape onto the top of the pinecone to make a pinecone impression, which will help with gluing later. Once the body is done, stick a small piece of wire or paperclip in it, this is what we’re going to stick the head on once we’re done making it, so you’ll want to cut the paperclip to size to make sure it doesn’t stick out of your head once it’s on.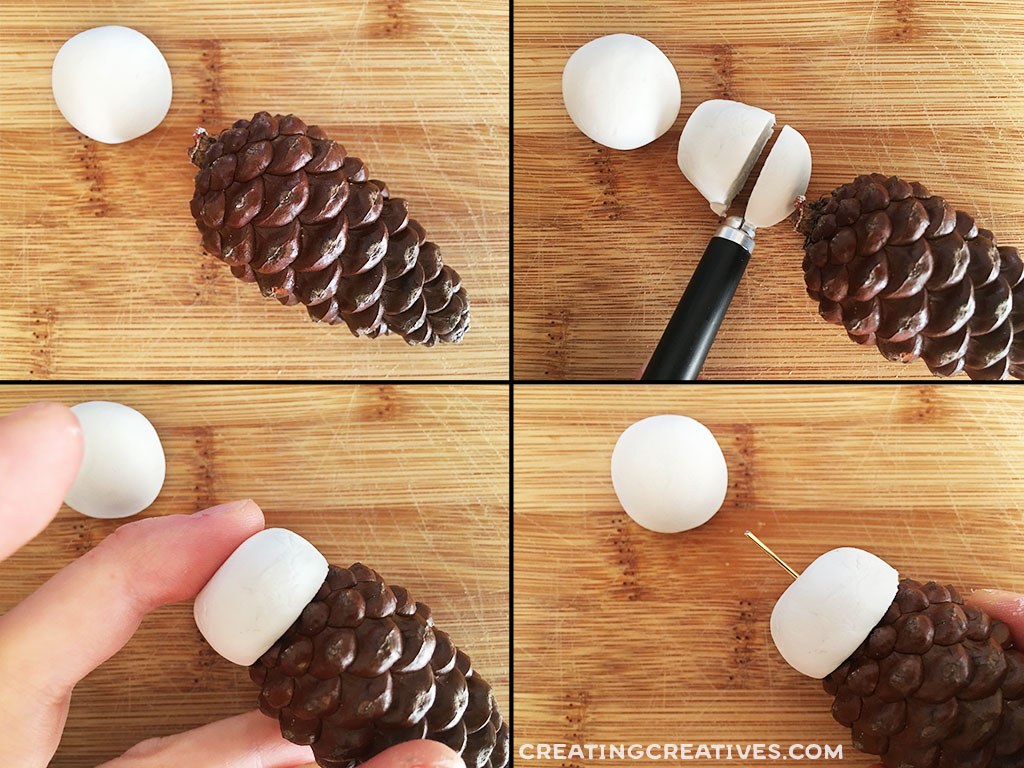
3. Now roll out 2 little balls for the mermaid shells. Once rolled flatten them out and pinch one side giving it a tear drop shape. Then use a paper clip or toothpick to make some marks on the rounded side and attach them to the body.
4. It’s hair time, and you can do this in a variety of ways. We did one where we rolled out a few ‘snakes’ then stuck them onto the head. Another way is to roll a ball and flatten it into a circle then shape it onto the head. There really are so many possibilities. Have a play and once you’ve figured it out be sure to score, rub with water and attach the hair.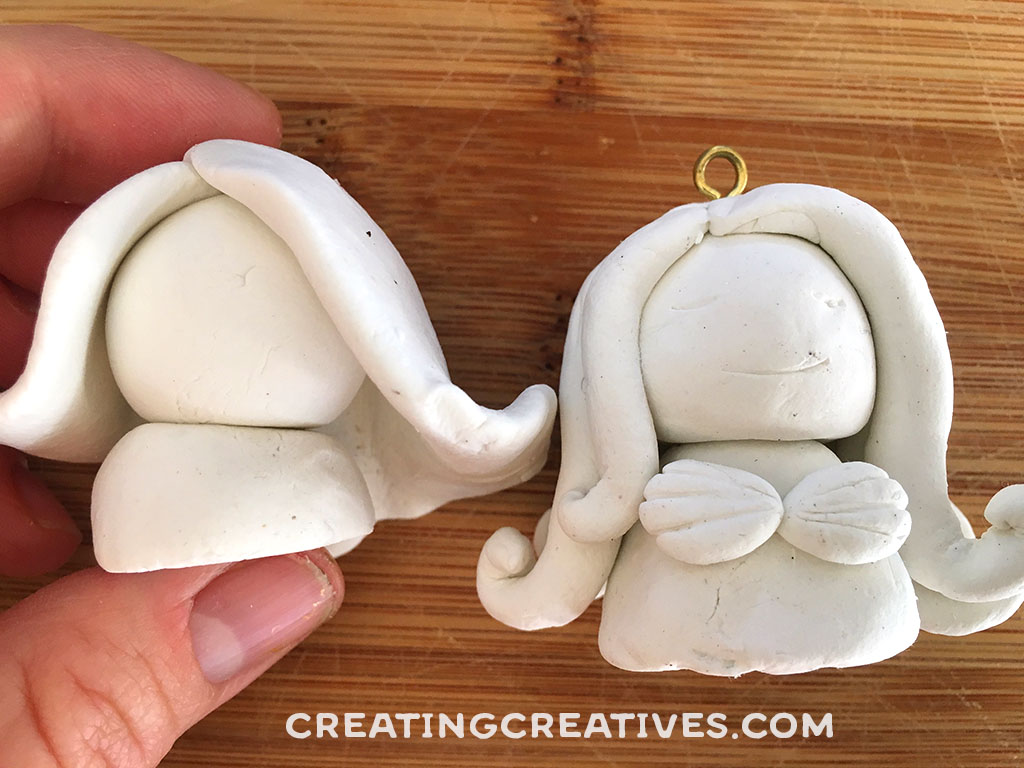
5. Once your hair is done you can add some facial features, or you can save them for painting later. Then attach your head onto the body by pushing your wire into the head and securing in place.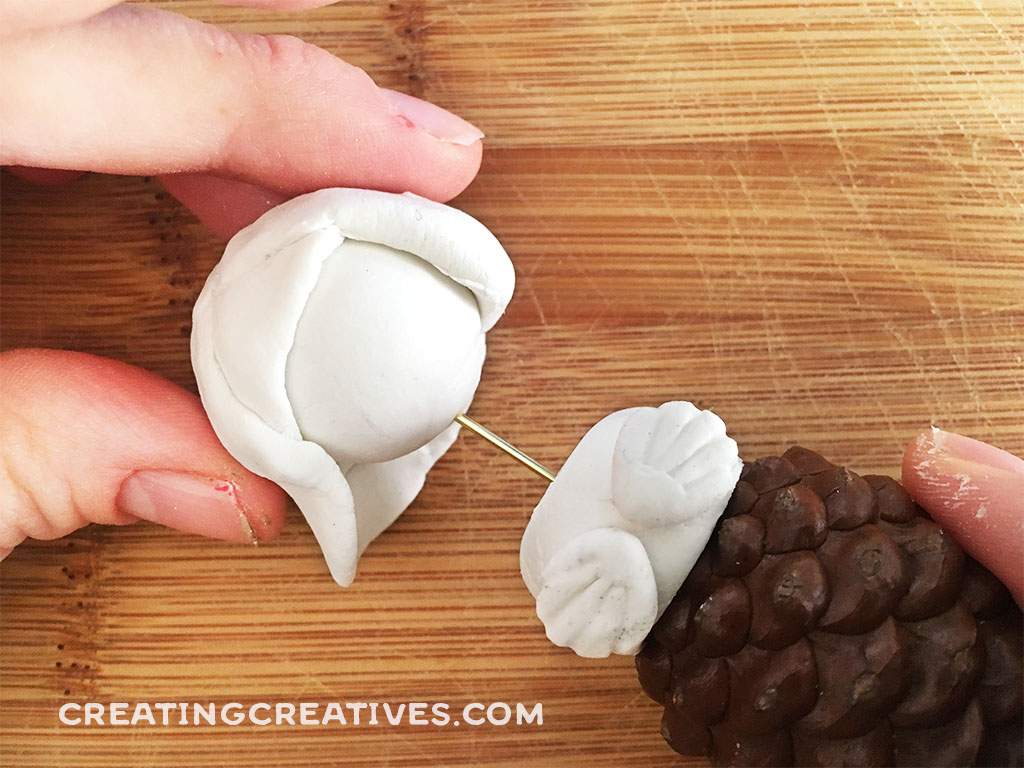
6. Now it’s time for the arms, to make them roll 2 pieces of clay into ‘snakes’ then attach at the shoulders. It’s better to roll them a bit long and then cut them after you’ve attached them. Once attached form them into place on your pinecone.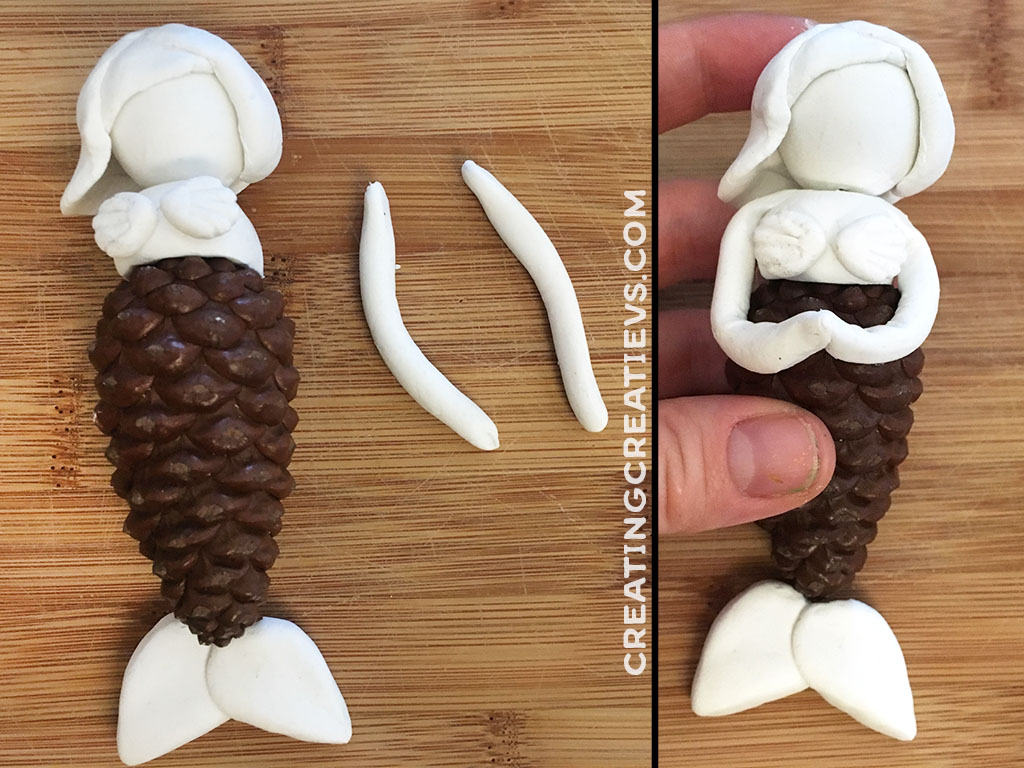
7. Screw your eyelet into the top of the head.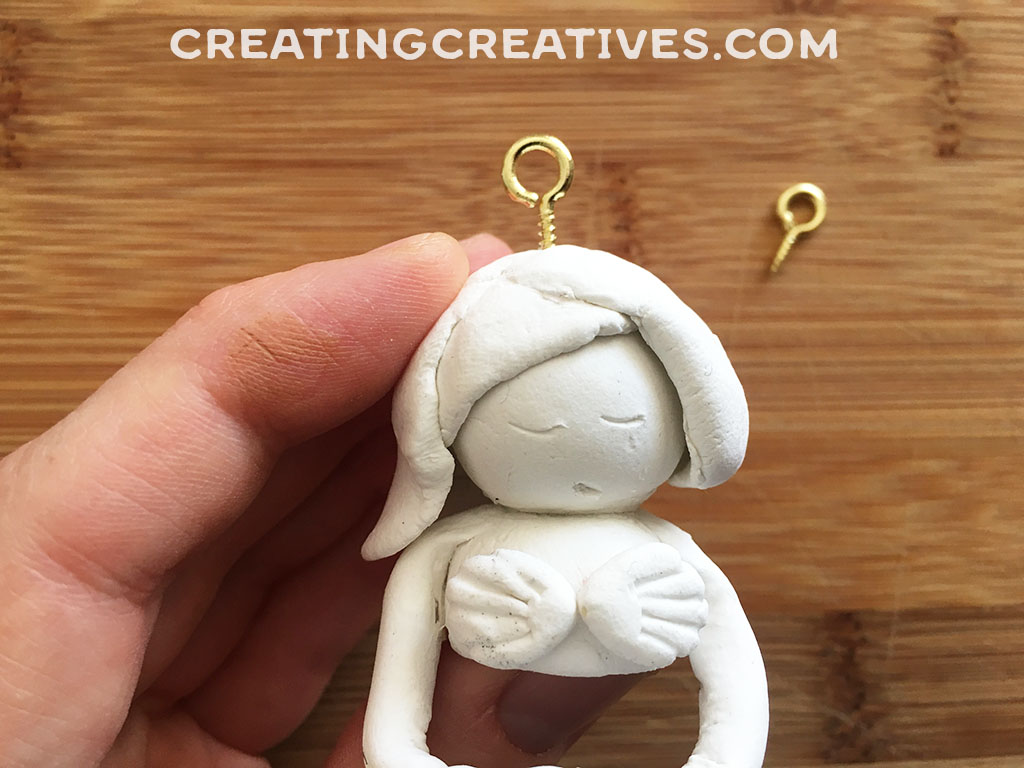
8. Now place your mermaids attached to their pinecones on a cookie sheet and either let air dry, which could take a few days, or bake at 200 degrees fahrenheit in an oven checking it every hour. We put the clay, pinecones and screw eyes all in the oven to bake together.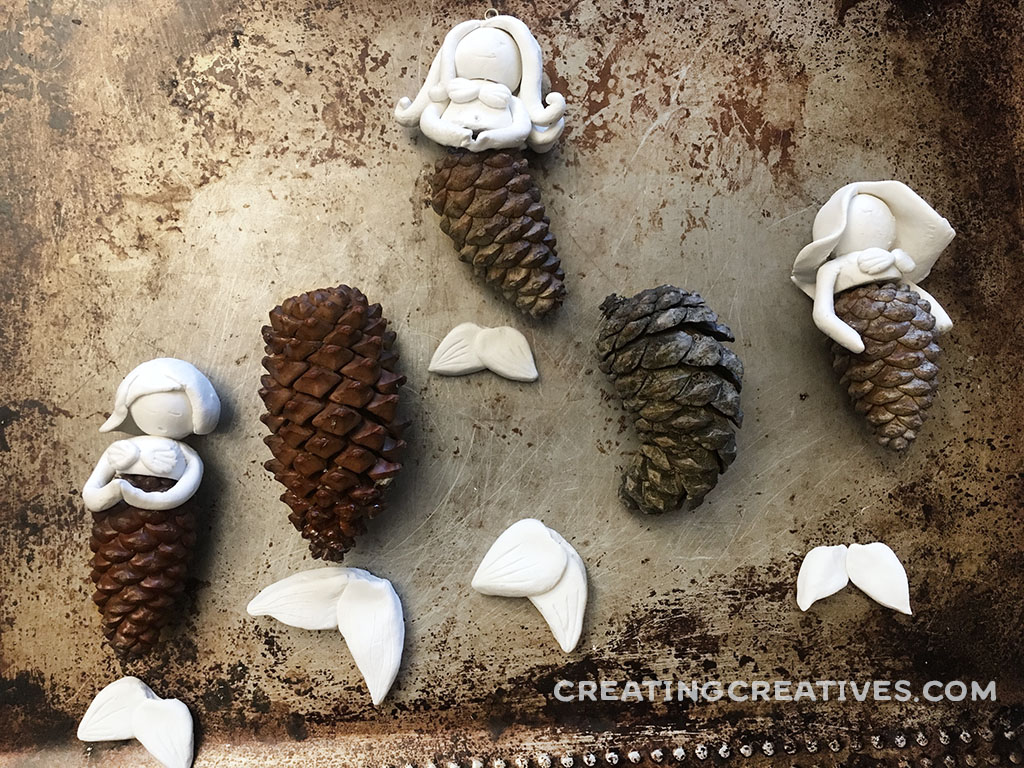
9. While your clay is drying you can give your pinecones a primer with white paint. This will help the tail color show up brighter. 
10. Once your pieces are dry you’ll want to make sure the clay stuck together where you wanted it to. To check that it did, give parts that you attached together a gentle pull, if they come off, have no fear, you can use some super glue to glue them back together.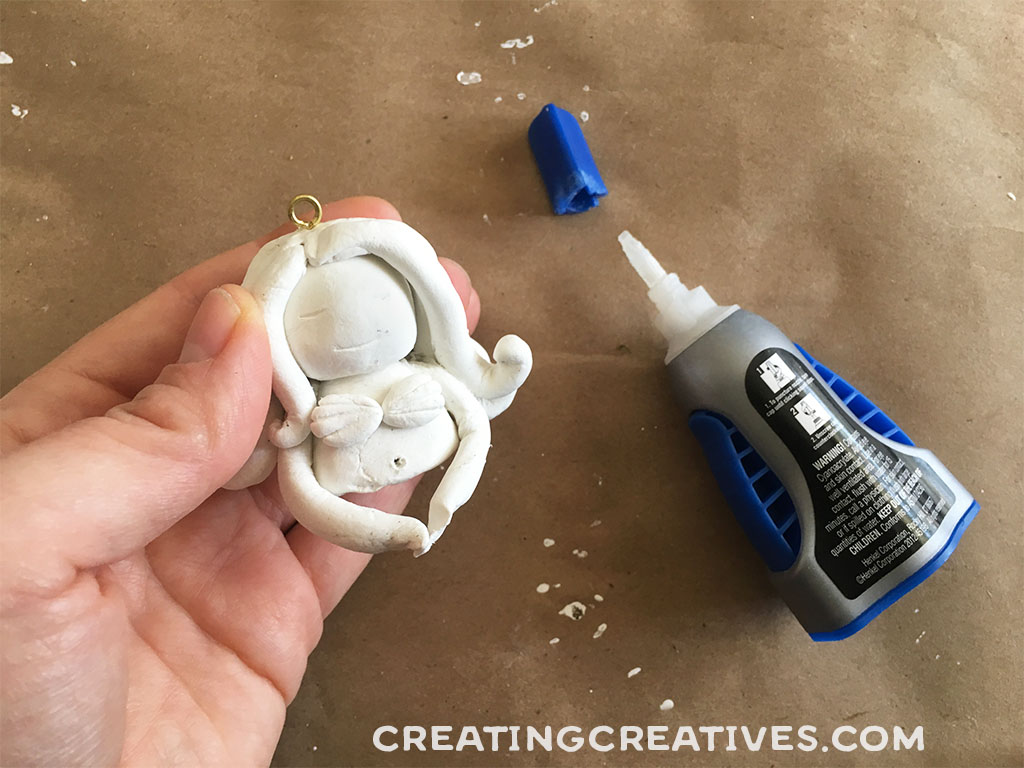
11. Now it’s time to get your paint on. Choose the colors you’d like to use, I found there are 3 main colors: hair, shells & tail. You can see I had a play on my paper to figure out what colors I wanted them all to be. When painting I found it easiest to paint the bodies first, then the hair then the shells.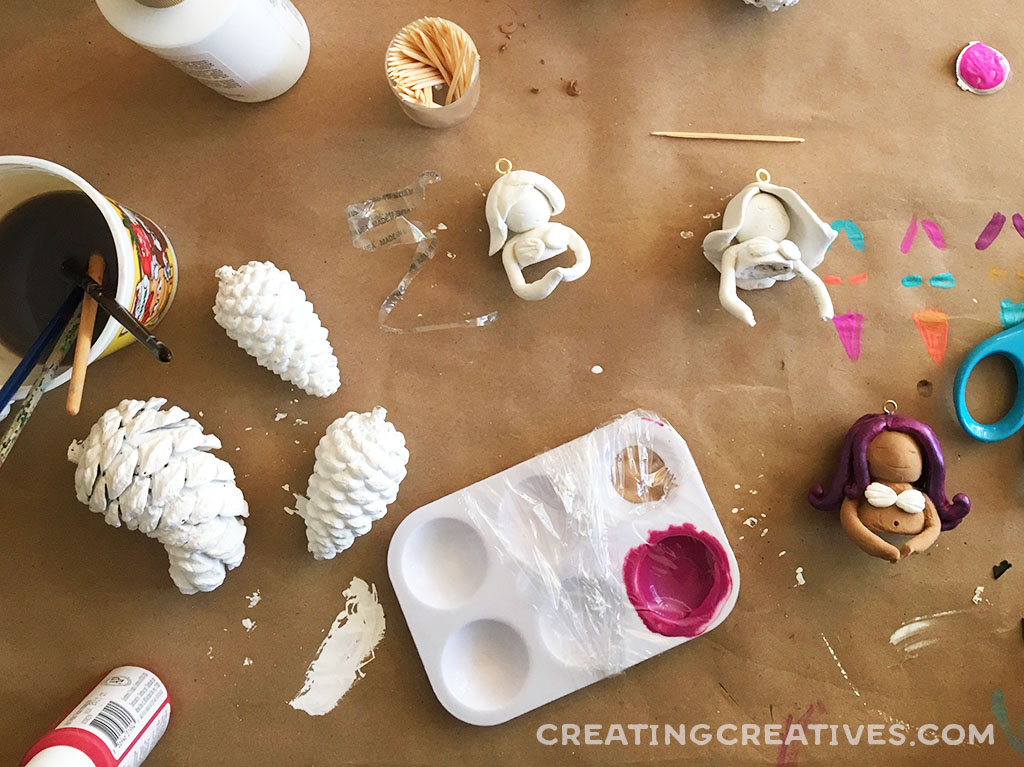
Here’s a close up, of my bodies, I kept it pretty simple with closed eyes and little rosy cheeks.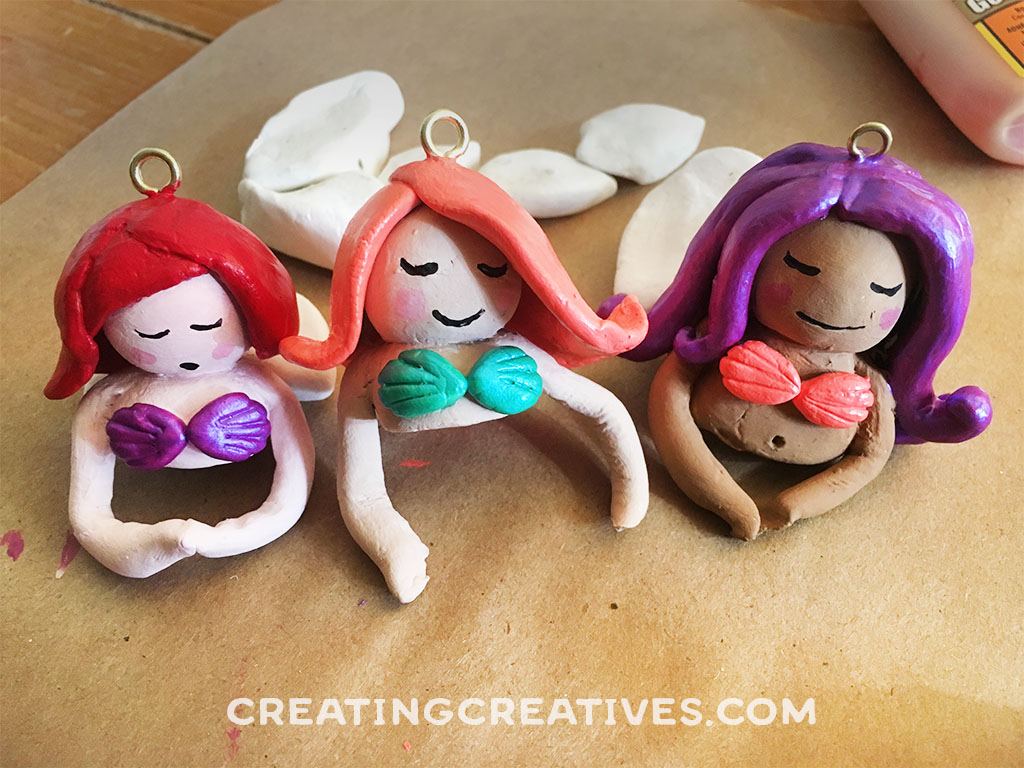
12. Now it’s tail time! Bust out your ombré (the gradual blending of one color hue to another) skills, cause ombré tails are just dreamy! It’s quite easy, start with one color at the top of the pinecone, and paint it half way down, then add the second color to the bottom and paint half way up. Blend the two colors in the middle and you’re done. For our ombré tail we blended white into our aqua for the top color and a little blue into the aqua for the bottom, then used the normal aqua to blend in the middle. Once you’re happy with your tail get some glitter and sprinkle onto the tail when wet.
13. Once everything is dry it’s time to assemble! I found super glue works best, but if you’re having trouble which I did on one of my tails, hot glue also works. Glue the body to the pinecone tail, and let dry. Then glue the tail onto the bottom of the pinecone.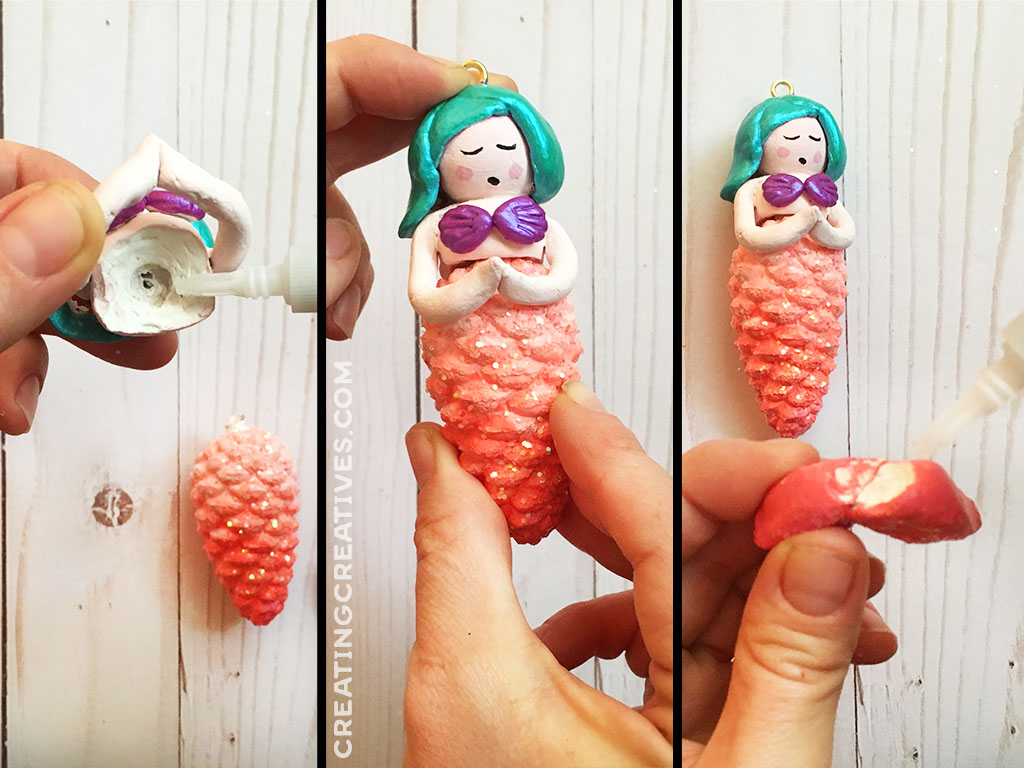
14. Now for the finishing touch, the waistband. Take 2 small pieces of pipe cleaner, we used ‘bump chenille’ and hook them around each other, this will go right around the belly button area. Then fit through the arms and twist closed at the back.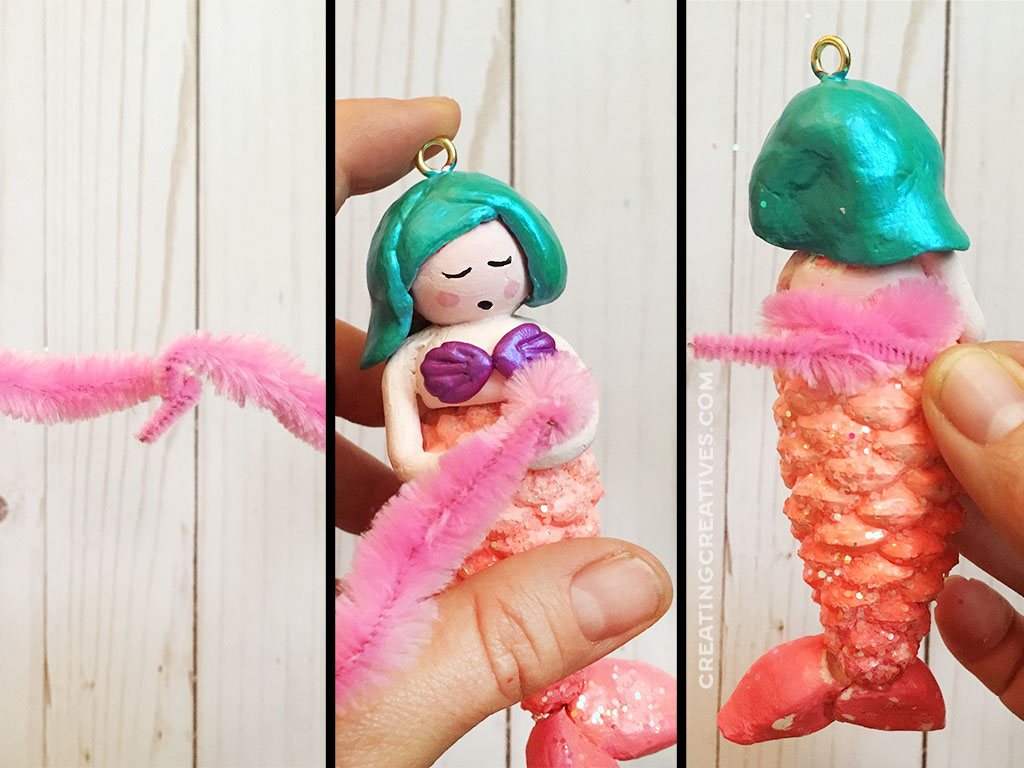
15. Thread some ribbon through they screw eye and you’re done! Hang with pride on your tree or give as a gift to a friend.
SHARE YOUR DIY MERMAID ORNAMENT:
Spread the word and Pin and Facebook share with your friends!
HERE ARE SOME OTHER PROJECTS YOU MIGHT LIKE:
Foxy Rudolph Softie

Free Christmas Ornament Guide
Egg Carton Mermaid Necklace

Pingback: » Paper Bag Poinsettias
Pingback: Craftmas: A Craft Festive Round-Up - Little Button Diaries